Showing posts with label craft plus uk classes. Show all posts
Thursday, 27 September 2018
Encased Oxide Ink
Wednesday, 26 September 2018
Snow word card

My card tonight uses the Stag die from within the Snowflake Wreath die set from John Lockwood. It has been die cut in Black and twice more on white card, then glued together. This is a good idea if you want to add some dimension but the image is too intricate for adding foam pads. The frame and the letters were die cut from cardstock I had inked with Oxides and water. Take your chosen colours, in this case Tumbled Glass, Salty Ocean and Wilted Violet, dab some onto a mat and then spritz with water. Turn your cardstock onto right side and press into ink and swoosh around until you are happy. Heating in between and then adding more ink, creates a more oxidized effect. I stamped the Let it snow from a stamp set by Marianne called Christmas Song in Black ink across the bottom of the stitched rectangle from Presscut. Finally, added some glitter drops in the centres.
Tuesday, 25 September 2018
Framed Poinsettia
My class today was based around Distress Oxides . There has been a release of new colours and I wanted to show three different ways to use these wonderful ink pads.


Today’s card uses the Framed Poinsettia stamp from Woodware . I have used Candied Apple , Mowed Lawn and Tea Dye (last two are from the latest release) Oxides and coloured with a water brush on Watercolour card. The image has been stamped with Black Versafine ink. The side panel has been created using a Versamark ink and the stamp. The sentiment comes in pack .
Sunday, 23 September 2018
Let it Snow
Hi there , hopefully you got some crafting in today because it was horrible weather outside. This is my last card from my acetate class using Creative Expressions Glitter Kisses Midnight Sparkle . The stencil is also from Creative Expressions and is from their mini range. Very simple and easy to do and Glitter Kisses dries quicker than texture paste , which is why I use it in class.
Saturday, 22 September 2018
John Lockwood Snowflake Wreath
Today’s card is the second from my acetate class. It uses the John Lockwood Snowflake Wreath. I have coloured the die cut with some Ice Blue Shimmer Shakers by Creative Expressions. I die cut the large circle in the set and then cut a smaller circle in the centre . A piece of acetate was attached at the back. The stag die is part of the die set and has been die cut from Silver Mirror card . The sentiment is from Lisa Horton Christmas Mixer Sentiments stamp set and has been stamped onto the background acetate with Black Stazon Ink. Finished off with some gems in the centres of snowflakes and my favourite Itty Bitty Creative Expressions bow. Instead of attaching to a square card base I die cut another large circle and made it into a circle card. Tip: take a little off the bottom of the back circle to stop it wobbling when standing .


Hope you are having a great weekend and I will be back tomorrow with the last card from this class.
Friday, 21 September 2018
Acetate class
Good evening, today’s card is the first from my class last week using acetate. There are several types/thickness of acetate. Just make sure if you want to use embossing powder on some it’s heat resistant ( it should say on package ). This acetate was quite thick and I wanted to emboss it with a embossing folder. It worked really well, the folder was Falling Snow from Creative Expressions and it’s 8”x8” so you need an A4 machine . Crafts too do a smaller Snow embossing folder if you don’t have a big machine.

The Poinsettia was made using the John Lockwood Poinsettia stamp and die set. It has been stamped on White card and embossed with Silver Sparkle Wow powder. The leaves are from Creative Expressions and are called Christmas Stems but I can see them being used all year. I die cut them in White card and coloured with Oxide Bundled Sage and Peeled Paint Ink, using a dauber so as not to rip the leaves. The circle frame has been cut with Presscut Stitched Circles on Silver Mirror card. Finished off with a sentiment die from Creative Expressions die cut several times to add dimension and I added some glitter drops on the leaves using Cosmic Shimmer glitter PVA ( which I made the night before and added when hard)

The Poinsettia was made using the John Lockwood Poinsettia stamp and die set. It has been stamped on White card and embossed with Silver Sparkle Wow powder. The leaves are from Creative Expressions and are called Christmas Stems but I can see them being used all year. I die cut them in White card and coloured with Oxide Bundled Sage and Peeled Paint Ink, using a dauber so as not to rip the leaves. The circle frame has been cut with Presscut Stitched Circles on Silver Mirror card. Finished off with a sentiment die from Creative Expressions die cut several times to add dimension and I added some glitter drops on the leaves using Cosmic Shimmer glitter PVA ( which I made the night before and added when hard)
Hope you like the colour scheme, thought it would make a change from Red Poinsettias. Back tomorrow night with another idea for using acetate.
Have a great weekend
Thursday, 20 September 2018
Stylish Reindeer part 3
Here is my third card using the Woodware Stylish Reindeer stamp from Woodware.


It’s my take on a card my friend Gill designed . I used the Woodware Wood Panel stamp in the background using Versamark ink on Grey card, I stamped in twice to make a bigger piece as the card size is 7”x 5” . Then I used Wow White Embossing powder to hear emboss the Reindeer which has been stamped in my Wow ink or you could use Versamark ink. Once heat set it has been cut out using my Presscut Stitched Oval die. Finished off with Creative Expressions Itty Bitty bow die in some patterned card from Hobby House and I stamped the sentiment in Grey ink and added a gem.
Wednesday, 19 September 2018
Stylish reindeer part 2
Today I have my second card to share using the Stylish Reindeer stamp by Woodware.

This time I made a background using Shimmer shaker Denim Dash. I then stamped the reindeer with Black Archival ink. I made a frame using Presscut Stitched Circle dies and I used the left over bits from my Shimmer Shaker piece if card to create the snowflakes . These are from Dovecraft, but you can use any from your stash. The sentiment is included in the stamp set and I finished off with some gems.

Tuesday, 18 September 2018
Woodware Stylish Reindeer
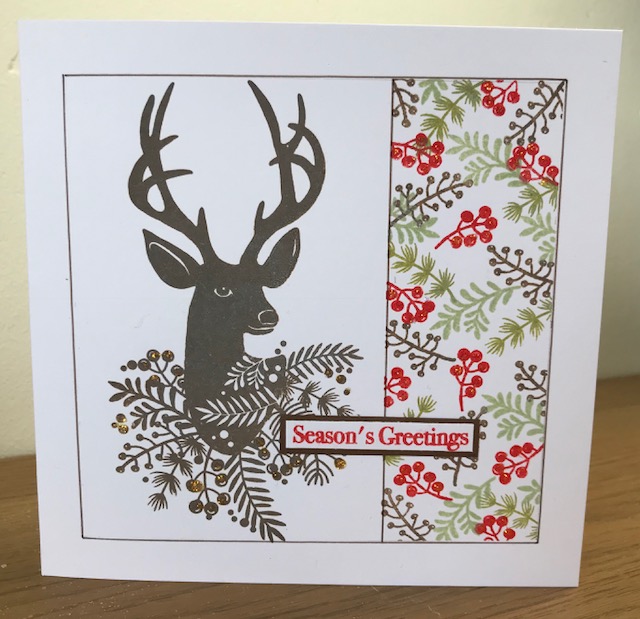
I am sharing one of three cards I made using the Stylish Reindeer stamp from Woodware. This card is completely flat besides the sentiment. I stamped the Reindeer in Walnut Stain ink, the foliage stamps are inked with Bundled Sage, Peeled Paint, Candied Peel and Walnut stain Oxide inks. I created a box with a pencil and then lined post it notes and when it was completed I went over it again with a Brown fine liner pen.
The sentiment comes in the stamp set and is inked with Candied Peel Oxide and mounted onto a scrap of Brown card. I finished off with some Diamond Stickles.
Friday, 31 August 2018
John Lockwood New Release
Today I am sharing 2 cards I made recently for classes using some new products from John Lockwood. First one is the Poinsettia stamps and co-ordinating die, together with the Holly Quilt stencil. The foliage die is new from Sue Wilson and is called Christmas Stems. I added some Berry Red PVA from Cosmic Shimmer for the berries and some Mark Richards Gold Nailheads for the centres .

The second card using his new Snow stencil which has been inked through with Versacolor White ink. The tree, from his Winter tree stamp set from last year, has been embossed with Silver Sparkles from Wow. The Oval die is from Presscut and the snow drift at the bottom has been created using the Sue Wilson Hills and Clouds die set.


The second card using his new Snow stencil which has been inked through with Versacolor White ink. The tree, from his Winter tree stamp set from last year, has been embossed with Silver Sparkles from Wow. The Oval die is from Presscut and the snow drift at the bottom has been created using the Sue Wilson Hills and Clouds die set.
Friday, 10 November 2017
Autumn Leaves
A big background stamp and some gorgeous little leaf dies on todays post. Full detail below, click on the link.
https://www.dantanner-uk.com/2017/10/30/falling-leaves/
Thursday, 9 November 2017
Squirrel Card
Lovely layering stamp from Marianne, a great card for the men in your life. Full details here of what I used .
https://www.dantanner-uk.com/2017/10/27/red-squirrel-card/
Wednesday, 8 November 2017
Autumnal flower card
Todays card has an Autumnal feel and is a new stamp from Woodware. Full details of what I used are on the shops blog page, follow the link below
https://www.dantanner-uk.com/2017/10/23/autumnal-birthday/
Tuesday, 2 May 2017
Pixie Powders
Here is my third card using Pixie Powders. I used one of the large ferns from the Dutch Doobadoo Paper Art Fern sheets in the shop. I carefully cut it away from the sheet in comes in ( different sizes on each sheet) I coloured it by tapping a small amount of some Bronze Blush powder onto a plate or mat and then spritzed with water. I then dabbed it repeatedly in the wet powder, dried and then added some more to build up the colour. The background is just some white cardstock, sprinkled and spritzed with some Pale Olive powder and dried.
I then stamped the script stamp from the Wow Wall Art stamp set with Brilliance Copper ink randomly over the cardstock. I also added a little powder to the small piece of card the fern is on. I edged both pieces with the Copper ink.
Monday, 1 May 2017
Cone Flowers and Pixie Powders
This card uses the Woodware Cone flowers and it has been stamped onto watercolour card with a black pigment ink and then heat embossed with Wow clear embossing powder. This technique is great to use when you are going to colour with watercolour type mediums as it keeps the colour within the lines of your image. To colour I sprinkled a little Pixie Powder onto a palette and mixed in a few drops of water using a water brush. You can use an ordinary brush and a cup of water if you prefer. I used a fine tipped brush, its easier to get in the really small areas.
The mica in the Pixie Powders really comes through when its dried. I coloured a scrap of watercolour card with some of the purple powder and then stamped my sentiment from a Sweet Dixie set on the top. Finished off with a very simple mat of black card. The colour Pixie Powders I used were Purple Violet, Golden Mint, Mango Blaze, Sun Yellow, Bronze Blush.
Sunday, 30 April 2017
Pixie Powders
Hi, hope you are all having a lovely bank holiday weekend. I have been playing with Creative Expressions Pixie Powders recently and today I am showing the first of three cards I made.
I used the Sun Yellow, Mango Blaze, Aqua Lagoon, Golden Mint and Purple Violet. I created the background first by tapping a small amount of the powders onto some white cardstock and then spraying with a fine mister spray. I dried it off with a heat gun and cut it to fit the frame I had made using my Presscut Stitched Rectangles dies.
The flowers are from Elizabeth Designs and are called Dandelion Fluff. The sentiment circle is from Craftwork Cards.
Back tomorrow with another one
I used the Sun Yellow, Mango Blaze, Aqua Lagoon, Golden Mint and Purple Violet. I created the background first by tapping a small amount of the powders onto some white cardstock and then spraying with a fine mister spray. I dried it off with a heat gun and cut it to fit the frame I had made using my Presscut Stitched Rectangles dies.
The flowers are from Elizabeth Designs and are called Dandelion Fluff. The sentiment circle is from Craftwork Cards.
Back tomorrow with another one
Thursday, 13 April 2017
Product of the month class card 3
This is the third card from my recent class using Wow Fab Foils. For this technique I used up scraps of foil I had left over....so don't throw anything away.
The background is from Creative Expressions Dotty Daisies embossing folder. The foiled square is Wow Blush foil on top of a piece of double sided adhesive. I die cut a heart shape from a piece of card covered with double sided adhesive. I then dabbed some of the foil scraps shiny side up randomly over the sticky paper. Once finished I threw on Glamour Dust glitter to fill in between the foiling. The sentiment is from Woodware and is called Just for You.
Back soon with some Easter cards.
Saturday, 8 April 2017
Product of the month card
Good morning, hope you all have a lovely weekend planned. Todays card is the second one from my class last week using Wow Fab Foils.
The stamp set is from Honeydoo and is called a trio of flowers, I stamped the flower with versamagic pink grapefruit and then using a quickie glue pen I flicked the veins of the flower with the pen and waited until the glue turned from blue to clear. That's very important, it wont work if the glue is wet and not tacky. Once the glue is clear I laid pieces of copper foil over the top rubbed and pulled the foil off.
The leaves were stamped with versamark ink, then I threw bonding powder over the top. Heat with a heat gun and then whilst its still hot get the green foil on and rub. If you find you get an uneven effect I have found that running it through a die cutting machine helps to get even pressure over the image. The lattice is a die cut from one of Sue Wilsons lattice bows and I stuck some double sided adhesive to some lightweight card and run it through my machine. I took the top layer of adhesive off and then applied the copper foil. You must remember to have the copper side facing you or else it wont work. Finally, my flower centres are circle foam pads which we all have in our glue boxes, just attached to flowers, take the top off and rub some scraps of foil over and pull off. The sentiment stamp is from Woodware and is called just for you.
Don't throw any scraps away, they can all be used. My other top tip for using with foil is keep a clean or new pair of scissors for foils, like you do ribbon. Any sticky stuff on scissors rips the foils and screws it up as you cut.
Hope you are enjoying seeing different uses with foils, back again soon with an anniversary cards using scraps of foil and glitter.....a gorgeous combo.
Wednesday, 5 April 2017
Product of the month class
Yesterday I held the first class using the new Product of the month at Craft Plus UK. For April its Wow Fab Foils, they come in 14 colours and you can use them with either hot or cold techniques.

Todays post features one of the cards from the class using the Stamps by Chloe Flower Border Builder stamp set and a sentiment from Sweet Dixie.
I used the purple foil on top of some double sided tape, the tape was attached to the card first, then take off the top strip and apply the foil....COLOUR SIDE UP....on top of the tape and using your fingers rub and burnish the foil to the tape. Whip the foil off and you have a lovely foil strip. For the flowers I used Bonding Powder. I stamped the base layer of the stamp with a Lavender ink pad then stamped the top flower stamp with Versamark Ink and then sprinkled Bonding Powder over the top. Its similar to embossing powder, you heat with a heat gun, it takes longer as the granules are a little thicker. Then immediately apply the foil over the stamped area and rub again like on the tape or you can run I through your die cutting machine.
You are not cutting anything just applying even pressure. Remove the foil and you get a gorgeous foiled image. I have to say foiling is not the easiest thing to photograph, especially as I am only using phone but the cards are available to view in shop for a closer look. The grass and two stems come in the stamp set. There are special offer of 10% off the Wow Fab Foils and Bonding Powder and 30% the First Edition products .
Keep an eye out for more cards during the month featuring foiling.
Todays post features one of the cards from the class using the Stamps by Chloe Flower Border Builder stamp set and a sentiment from Sweet Dixie.
You are not cutting anything just applying even pressure. Remove the foil and you get a gorgeous foiled image. I have to say foiling is not the easiest thing to photograph, especially as I am only using phone but the cards are available to view in shop for a closer look. The grass and two stems come in the stamp set. There are special offer of 10% off the Wow Fab Foils and Bonding Powder and 30% the First Edition products .
Keep an eye out for more cards during the month featuring foiling.
Tuesday, 14 March 2017
Butterfly Circle
Good evening, the last card today from my Stamps by Chloe class. This card uses the Butterfly circle die and matching stamp. This time I stamped and embossed with Wow white embossing powder. The sentiment is from Sweet Dixie and fits in the inner circle perfectly. The glitter background has been made using the new Creative Expressions glitter kisses in silver. I used the sponge applicator to spread the medium on a piece of card slightly bigger than the black. It needs a few coats but can be heat set with a gun, its dries quickly. When the butterfly wings are popped up you can see the glitter behind. Comes in a great range of colours. Finished off with a few gems.
Subscribe to:
Posts (Atom)
Brushed Blooms
I made this card quite a while ago with the stamps and dies from the Stampin Up Brushed Blooms set, that appears in the Jan/June 2021 mini b...
-
Another in the series of fun folds and today's card is a concertina one , when this folds in it will fit in a 6" envelope. It's...
-
I made this card quite a while ago with the stamps and dies from the Stampin Up Brushed Blooms set, that appears in the Jan/June 2021 mini b...